Warning:
You need to have a developer’s knowledge to be able to use our REST API, since we are not able to provide support for custom coding!
Table of contents
- About Nextend Social Login REST API
- How can I use the REST API?
- Making request with the Access Token
- REST API endpoints and Access Token format
- Skeleton code: Registration and Linking
- Common error messages
About Nextend Social Login REST API
The REST API of Nextend Social Login can be used for checking whether there is a user in your site that has already registered with the currently used social account or not. So our REST API won’t handle the login or registration process, as that must be implemented with custom coding.
How can I use the REST API in my application?
For integrating social register / login in your application, you need to a implement the following process:
1. Communication between the user and your mobile app:
You need to create a way for the user to communicate with your social APP, so basically a way to display the authentication and authorization screen when the user clicks on the social button. Over the “Authentication” screen the user will be able to login to the associated social media account. At the authorization screen, the person will be able to grant permission for your App to see his/her user information. Once the user logged in and authorized your app, it will return an access token, which is used for the validation.
2. User validation:
When you have the access token you can use it to communicate with the REST API of Nextend Social Login (NSL) which will check whether there’s any user registered to your site with the given access token. The JSON encoded access token should be posted to our REST API endpoint.
Method: POST
Endpoint: /wp-json/nextend-social-login/v1/{{providerID}}/get_user
POST Args: access_token
For example:
NSL Google provider REST API endpoint:
- https://example.com/wp-json/nextend-social-login/v1/google/get_user
The access_token needs to be a JSON encoded string, like these.
Response:
- Success – status 200 -> json encoded WP user id, for example:
"44"
- Fail – if the status code isn’t 200 then an error occurred-> For example:
{"code":"error","message":"The access token could not be decrypted","data":null}
3. Handling the Login / Registration process:
- Access token found – Login process
If NSL returns the WordPress user ID you’ll need to log them in to your Application. - Access token not found – Registration process
If NSL did not find any user with the given access token, you need to create a new WordPress account using WordPress’ REST API. Then log them in and you can link the user with the social provider.- line 1-11: will verify that the access token is valid, if it is valid it will retrieve the social user id ( this ISN’T the WordPress user id! )
- line 13-16: will connect the social provider account with the WordPress user ID.
Making request with the Access Token
Post request with cURL
In the following example you can find a basic example for posting your access token to the REST API of Nextend Social Login using cURL. You can download this basic gist, modify the value of the $url variable with your own domain and the provider name that your access token is associated with. Then you need to modify the value of the $access_token variable according to your own test access token.
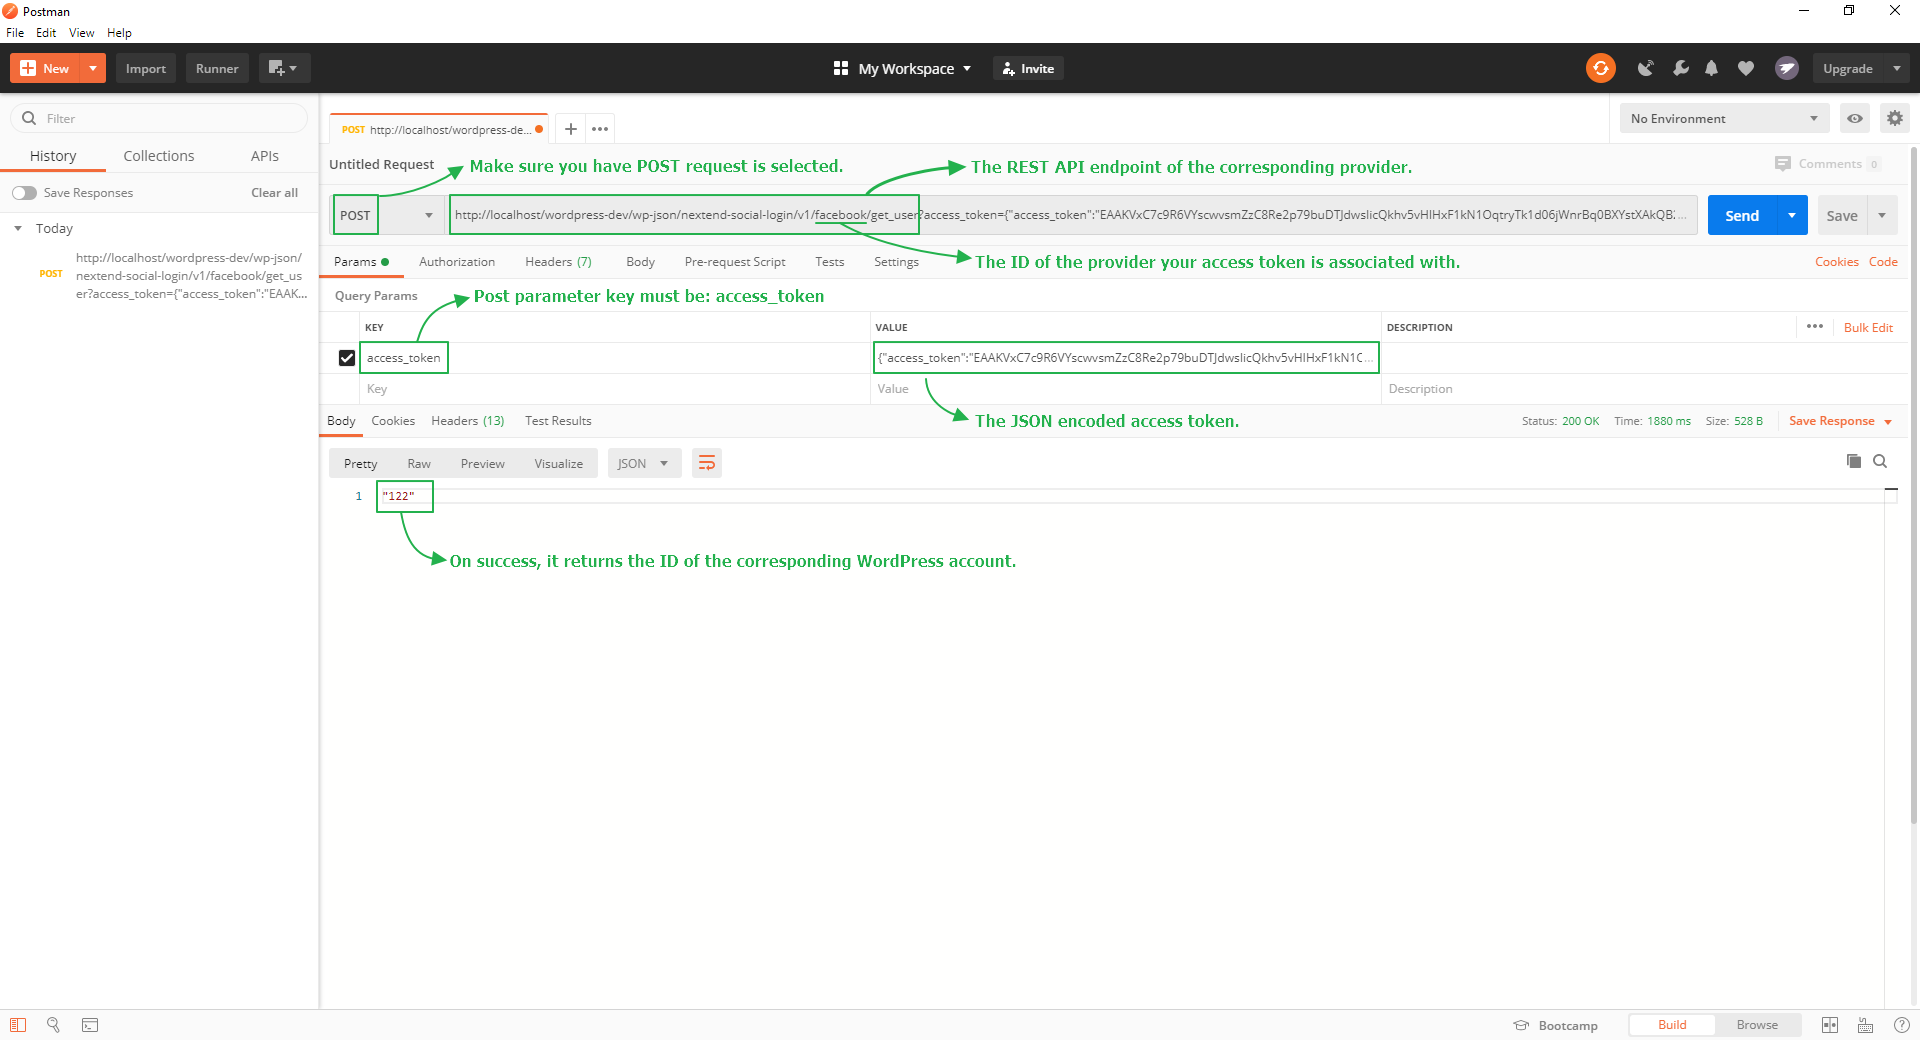
Post request with the Postman App
Make sure you send the access token as a POST parameter where the parameter name is access_token!

REST API endpoints and Access Token format
Endpoint:
- https://****/wp-json/nextend-social-login/v1/facebook/get_user
Access token format:
{"access_token":"*************","token_type":"bearer","expires_in":5183946}
Endpoint:
- https://****/wp-json/nextend-social-login/v1/google/get_user
Access token format:
{"access_token": "*************", "expires_in": 3600, "token_type": "Bearer", "id_token": "*************"}
X (formerly Twitter)
Endpoint:
- https://****/wp-json/nextend-social-login/v1/twitter/get_user
Access token format:
{"oauth_token":"*************","oauth_token_secret":"*************","user_id":"*************"}
Apple
Endpoint:
- https://****/wp-json/nextend-social-login/v1/apple/get_user
Access token format:
{"access_token":"*************","token_type":"Bearer","expires_in":3600,"id_token":*************"}
Endpoint:
- https://****/wp-json/nextend-social-login/v1/linkedin/get_user
Access token format:
{"access_token":"*************","expires_in":5184000}
Amazon
Endpoint:
- https://****/wp-json/nextend-social-login/v1/amazon/get_user
Access token format:
{"access_token":"*************","token_type":"bearer","expires_in":3600}
VKontakte
Endpoint:
- https://****/wp-json/nextend-social-login/v1/vk/get_user
Access token format:
{"access_token":"*************","expires_in":86400}
PayPal
Endpoint:
- https://****/wp-json/nextend-social-login/v1/paypal/get_user
Access token format:
{"access_token":"*************","token_type":"Bearer","expires_in":28800}
WordPress.com
Endpoint:
- https://****/wp-json/nextend-social-login/v1/wordpress/get_user
Access token format:
{"access_token":"*************","token_type":"bearer"}
Disqus
Endpoint:
- https://****/wp-json/nextend-social-login/v1/disqus/get_user
Access token format:
{"access_token":"*************","expires_in":2592000,"token_type":"Bearer"}
Yahoo
Endpoint:
- https://****/wp-json/nextend-social-login/v1/yahoo/get_user
Access token format:
{"access_token":"*************","expires_in":3600,"token_type":"bearer"}
Skeleton code: Registration and Linking
Available since: 3.1.7
The skeleton code below shows a basic example of how the functions of Nextend Social Login can be used for handling the registration and linking by using an access token.
Like mentioned this is just a skeleton code, so it won’t work as it is, it needs to be extended.
Common error messages
- Request is missing required authentication credential. Expected OAuth 2 access token, login cookie or other valid authentication credential.
- An active access token must be used to query information about the current user.
The problem is related to either your access token or the way you posted it.
To verify that the access token is fine, you could post it to the REST API of the corresponding provider via a basic form like this. ( Don’t forget to modify the “action” attribute with your own domain and the ID of the provider your access token is related to! )
