We are living in a constantly rushing world where every minute matters. Have you ever thought about how much time it takes to fill out forms each day? Probably a lot! This is especially true for registration forms. The chosen username might have already been taken, which means we need to find out another one. It can be annoying, isn’t it?
The solution is a social media login. This would provide a way for the users to register and login to your WordPress site with a social media account. For instance, your visitors could use their Facebook accounts to connect to your site.

Why should I use Facebook login in my WordPress site?
Most of the Internet users have already heard about Facebook. A large part of this community also owns at least one account. Moreover, some of these users are even logged in with this account while they surf the internet.
Since they already use this account, wouldn’t it be easier to connect with it to other sites, too? In this way you could avoid filling registration forms, thinking about usernames and trying to remember forgotten username and password combinations.
How can I display a Facebook login button on my WordPress site?
There are some WordPress themes that come with social buttons. However, if your theme doesn’t, then you have the choice to custom code one or use a plugin.
Using a plugin that was designed exactly for this purpose , such as Nextend Social Login, can make everything easier and simpler!
So if you are interested in achieving your goals with a plugin, then this topic is especially for you.
What is Nextend Social Login?
Nextend Social Login is a WordPress plugin which you can use to display certain social buttons on your site. The Free version includes Facebook, Google and Twitter providers.
But where can these social buttons show up?
Free version:
- they will appear automatically on the default WordPress login page like the /wp-login.php.
- in the forms that come from the wp_login_form() function.
- can also appear at a selected widget position
- at any page where you put the shortcode
- at any place in your theme by editing the codes of your theme.
Pro Addon:
- WooCommerce
- BuddyPress
- MemberPress
- UserPro
- Ultimate Member
- default WordPress Comment forms.
Anyway, these forms are just examples, with some work you can make the social buttons appear anywhere on a WordPress website.
Getting Started with the Facebook provider
Accounts registered via Facebook login will have the First name, Last name and Email address stored. Just like the default WordPress registration does over the forms. However, in this case, it is not necessary to type in each detail manually. The process becomes much faster and safer.
In addition, the Pro Addon can also store some extra information. For instance the age range, birthday and gender. Nevertheless, it is important to mention that to get these extra fields, you need an App Review.
Step 1: Install Nextend Social Login
- Login to your WordPress Admin area
- Go to Plugins → Add new
- In the search field type in: Nextend Social Login
- Click the Install Now button
- Once the plugin is installed, press the Activate button
Step 2: Create a Facebook App
- Navigate to the Facebook for Developers page.
- Login with your Facebook Account.
- Create a Facebook Developer Account, if you don’t own one, yet.
- After that, you will be able to create your first Facebook App like you see in our Facebook – Getting Started documentation.
Step 3: Setup the Facebook provider in Nextend Social Login
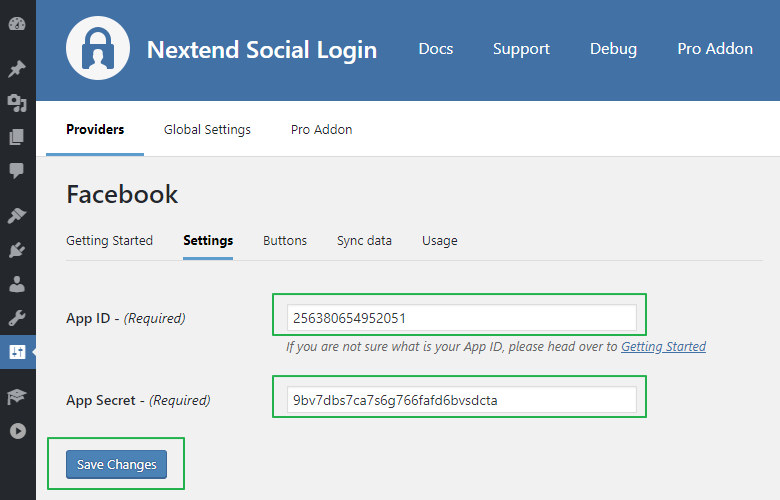
Once your Facebook App is ready, you will find the necessary App ID and App Secret at the “Basic” settings of your App.

You need to copy these credentials to Nextend Social Login → Providers → Facebook, after that, click on the Save Changes button.
Step 4: Verify the Facebook App settings.
The next step will verify that your App has been configured properly and your site can communicate with the created App. Clicking on the Verify Settings button, will establish a test connection between the site and the app.
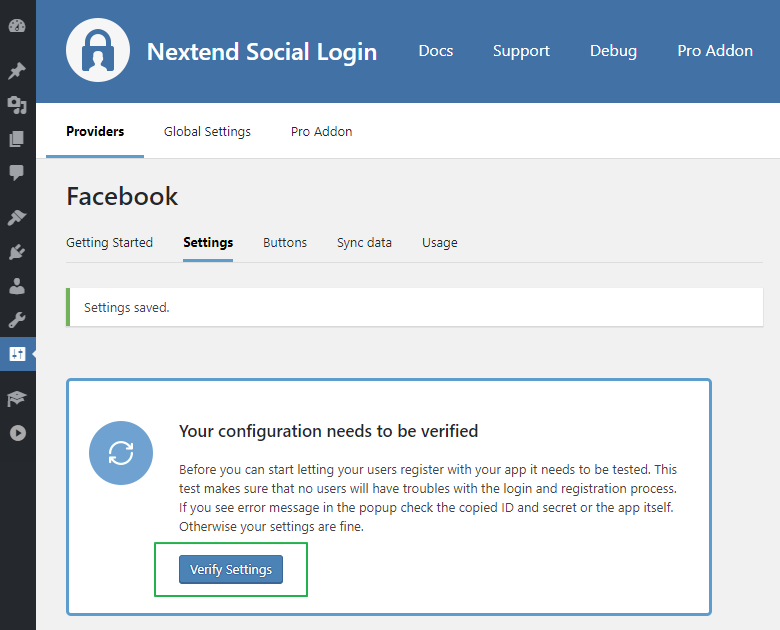
Once you have verified the settings, a message will confirm that the Facebook provider works fine:

Publish the Facebook login button on a custom WordPress page
To display a WordPress Facebook login button on a page, you should put the shortcode into any text elements or blocks.
In Gutenberg there is a block especially for shortcodes so feel free to use it.
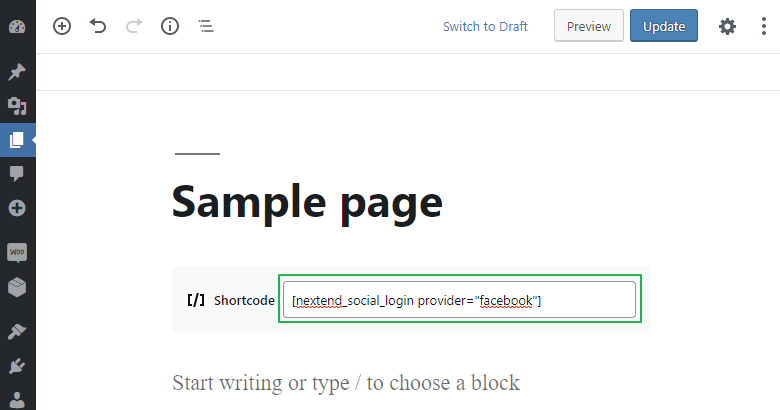
On the front-end, the social button will appear at the exact same position where you have used the shortcode.

The shortcode has multiple parameters. In other words, you have some options for customizing the login button. For instance you can:
- control which state of the button shall be displayed ( login / link / unlink )
- add a heading text for the buttons
- display only a certain provider
- change the style ( button or icon ) and alignment
- control where the user shall be redirected after the login
Summing up
There are many ways to improve the user experience on your site. Providing the users with a faster way to login is certainly one of these. After following this short guide, you probably already flaunt with at least one Facebook login button on your WordPress site. However, if you have any difficulties during the setup, just open a support ticket and we will help you!